

Jim Katen
-
Posts
10,273 -
Joined
-
Last visited
Content Type
Profiles
Forums
Articles
News for Home Inspectors
Events
Blogs
Gallery
Store
Downloads
Posts posted by Jim Katen
-
-
Timbor, Boracare.
-
I burned through a lot of lumber making the raised panels. Pretty much all of it. Had a miserable time with it twisting and curling when I ripped what started out to be 12 and 14 inch wide boards to a workable size. Never seen anything like it. I figured it was just a result of drying boards that were way too wide. . . .
I've had that happen with wood that came from trees that grew on a hillside. It seems to develop stresses that come out when you rip it.
-
Looks good, Gary.
No foot rail?
-
He had true wit and enough mischief in him to use it well.
-
. . . Also, forgot to note that I'm using true sized lumber.
What's "true sized lumber"? Are we talking engineered lumber?
-
. . . Or, would anyone have been taken back as much by this unfortunate event?
Nah. You did fine, Borat.
-
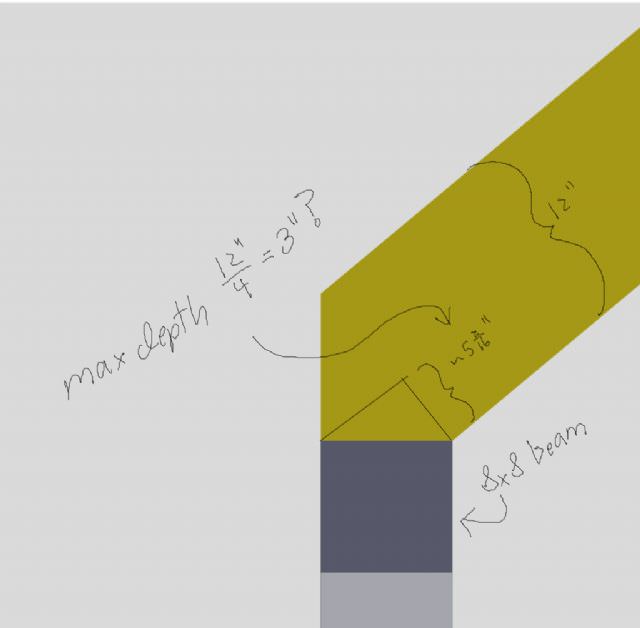
In a project I am considering using 12" rafters that sit on 8x8 beams at the side-wall (it is a 10:12 roof), but the rafters end at the outside face of the beam (the rafters are not part of the overhang) and this is why "birdsmouth" is in double quotes in the thread title. After reading through the residential building code, it would seem to me that the max depth that one can cut into the rafter at the top plate is 1/4 of the rafter depth (in this case, 12"/4 = 3"). First of all, is this correct?
However, the confusion is that my local code enforcement officer is saying that I can do a full bearing on the 8x8 side-wall beam. This would make the depth cut into the rafter just over 5" (more than 3"). See the picture below.
Click to Enlarge

18.07 KB
Am I misunderstanding something? Is there some sort of exception when the rafter itself does not extend past the top plate? I thought the main concern with cutting into the rafter at the top plate was related to potential shearing along the length of the rafter.
Looks fine to me. Since the rafter isn't extending past the top plate, you're not notching anything. You're overthinking it.
PS: remember that a 2x12 is only going to be 11-1/4" wide.
-
That's where the bird sits & poops.
-
A contractor wants to use EZflow for some drainage problems we're experiencing on our property, but I've been reading mixed reviews about EZflow. Some say it stopped working others say it never worked at all. Maybe this is due to bad installations or untrue testimonials.
What has been the experience with those of you that are using EZflow for drainage issues?
I've seen it used on two projects that I was involved with and it worked well in both. A nearby landowner used it to address drainage problems on his property about 10 years ago and it still seems to be working fine.
-
In your picture, it looks like there are no fasteners at all in the field of each panel, only around the perimeter. If so, the installation is in big trouble.
-
. . . Usually I would expect to see a dead fronqtscrewed in place to cover live parts.
The dead front is required to cover the live parts while the switch is being operated. Since this switch is supposed to be operated with the cover closed, no further dead front is needed. I don't know why, but most switches that I see don't have the dead fronts screwed in place.
-
It's a power monitor. The two current transformers wrap around the incoming service entrance wires and measure the current. The little transmitter sends the information to a display somewhere in the house where the occupant can read it to see how much power is being used.
One study showed that just having a device like this cut electricity use by 30% as people played little games with themselves to see how little power they could use. Kind of like the mileage display on a Prius.
-
Shouldn't there be a lock on that? Looks way easy for a kid to get into.
There's no requirement for one. When people put locks on these things they tend to lose the key or forget the combination. I suggest using heavy duty cable ties instead. It's enough of a deterrent to keep the really little kids out and bigger kids, well at some point they've got to learn about electricity . . .
-
.... just as porch rockers are often tethered to cables fastened to the house.
Tell me you made that up.
-
In my experience, when things begin like that, they don't improve over the course of the rest of the project.
-
I've investigated several of these. In every single case, the culprit was not sewer gas.
For some reason, people think that every strange smell must be sewer gas.
-
Thanks for posting that Jim. It seems outdated with 30 circuit 100 amp panels and even more so with the 42 circuit limit removed.
Absolutely. But it's still useful for identifying pre-2008 panels.
-
For those who are interested in doing a load calc, you can follow the guidelines directly from the NEC, use the info from Mike Holt, use the very easy form in Code Check, or get the "Resi Electrical Load Calc Pro" app for your phone.
After doing them by hand for years, I really appreciate the app. It's fast, easy, and accurate.
-
Not to derail this thread, but what rule should be followed in this scenario?
150 amp panel 2 poles using this equation 150 Amp x 2 Poles = 300 / 10 = 30. There should only be 30 breakers.
The panel model number is rated for 40 breakers- qoc40uf.
Do you go off the equation or the manufacture label?
The panel listing is used, not an arbitrary formula that assumes a load of 10 amps per pole.
I agree that the panel listing is the simplest and surest method. The formula, however, is not arbitrary. It's part of the UL listing for CTL designated panelboards and it can be useful if the panel listing isn't visible or if it's been destroyed.
-
There's no code requirement and, of course, ponds are outside the scope of our inspections.
I usually just say something like, "Small kids from the house or the neighborhood can easily get into the pond and drown. If you'd like to reduce that risk, install a barrier around the pond or a safety net over it. Check out www.katchakid.com "
-
Is the wall made from brick or is this just brick veneer?
-
So do the manufacture CTL rules still apply?
Absolutely. Existing panels can only be configured according to their labeling.
408.54 Maximum Number of Overcurrent Devices.
A panelboard shall be provided with physical means to prevent the installation of more overcurrent devices than that number for which the panelboard was designed, rated, and listed.
For the purposes of this section, a 2-pole circuit breaker or fusible switch shall be considered two overcurrent devices; a 3-pole circuit breaker or fusible switch shall be considered three overcurrent devices.
-
Steve, the attached document is from the Eaton/Cutler web site. It states that the NEC no longer limits the number of breakers in a loadcenter.
OK, I need an update. I thought NEC said total 42 circuit/breakers in a panel. Now it's unlimited?
Since the 2008 edition.
Here's the best explanation that I've seen so far:
-
There's two different kinds of overloaded:
If the panel is electrically overloaded, the only real way to tell is to do a load calc. Once you've gathered the necessary data, the calculation is very simple and takes only a few minutes.
If you're talking about physically overloaded, then you only need to look at the panel schematic and compare it to the breaker placement. It looks like too many breakers to me.
As for wads of wiring, if you can get the panel cover on, it's probably not overloaded. The requirements for cross-section fill allow a *lot* of wires in there.
Soaked solid wood flooring
in Interiors & Appliances
Posted
A neighbor got a deal on maple gym flooring from a local school that had flooded. The gym had been underwater for days. The flooring had been pulled up and tossed in a pile, where it sat for a year. We stacked it in his house until the moisture content was stable and we nailed it down as you would a new floor, tossing the worst pieces, and straightening out the rest as we went. After sanding and finishing it looked great. That was about 17 years ago and it's been fine.