All Activity
- Today
-
 Morgantheinspector joined the community
 - Yesterday
-
 superiorexteriorsusa joined the community
 -
 logiciel changed their profile photo
 -
logiciel joined the community
-
 clayproductsshop changed their profile photo
 -
clayproductsshop joined the community
-
 robertfmancusomd joined the community
 -
 ptbrilianzencoagroindo changed their profile photo
 -
ptbrilianzencoagroindo joined the community
-
 ProcreateGraffiti changed their profile photo
 -
ProcreateGraffiti joined the community
-
 nuragesport joined the community
 - Last week
-
 expresswigbraids changed their profile photo
 -
 columbiascperiodontist changed their profile photo
 -
 SportSide Medical Services changed their profile photo
 -
 thom.salon changed their profile photo
 -
 oiagefsis changed their profile photo
 -
 classroomcompanions changed their profile photo
 - Earlier
-
Hello Jason. I was thinking about the same topic couple days ago. So far I have come to the conclusion that there is couple of ways we could go about it and so far it is better to stay off and distant as much as we can if possible. Here is my experience: A techy customer got his report and put it into one of those services and He got numbers in 3 ranges: low , mid and high. He even called couple of contractors to compare prices and said that AI was off for couple hundred dollars. His deal felt thru because the sellers did not accept his repair request, his numbers were to high even in the low range. As for realtors I would not mind too much about them , trying to get numbers without killing the deal for themselves… We all know the low balls they try to pull off when they know the house committed suicide by itself. Another customer did the same thing after the repair request and negotiations and all that [ and repairs performed by Joe hold my beer ] , and He was short for a couple thousands on a defect that needed more repairs that the offered by sellers… Try to copy and paste a random summary of an inspection you have performed and ask google Gemini to give you an explanation followed by numbers and check in your local market if the numbers are off or not… I tried one summary and I got the impression that google numbers were about right; but I would not offer that option to a client , it is better that they do their own research; that way we are not the ones in the middle trying to inflate their expectations.
-

Low slope roof insulation question
fenceanddeckconnection replied to Whalen68's topic in Attics & Insulation
For your 10x15 room with 2x8 trusses and 2x4 roof deck, use rigid foam board insulation between the trusses for excellent thermal performance. Add spray foam or fiberglass batts to fill gaps and improve air sealing. A vapor barrier is important to prevent moisture buildup before installing the ceiling. This method ensures energy efficiency and long-lasting comfort. Good luck with your renovation! - Fence and Deck Connection -
Every inspector knows the rule: Don’t give repair estimates. It’s there to protect us — keep the report factual, not financial. But after two decades in this business, I’m starting to wonder if that same rule is also what’s boxing us in. Clients still expect numbers. Agents still push for “rough ideas.” And when we stay silent, they go looking elsewhere — contractors, Google, TikTok, whoever will talk. Meanwhile, we’re left looking like we’re hiding something. Now, new AI tools are showing up that analyze inspection reports and generate local cost ranges automatically. No inspector input, no opinions, no bias — just data. It’s doing the one thing we’ve been told not to do for twenty years: talk about money. That should make us stop and think — not because it’s replacing us, but because it’s saying out loud what the market’s been begging us to say all along. What do you think? Are we protecting our professionalism, or just protecting a rule that stopped protecting us a long time ago? — Jason Boni Guardian Home Inspection, Pittsburgh PA 21 years in the field
-
That's beautiful.
-
That's what they tell me. Boats and Corvettes seem to fair OK. It's recoatable, but not really easy to recoat. It requires thorough sanding followed by cleaning with acetone. (I already recoated it once becaue it was the wrong color) I figured the worst thing that can happen is it fails miserably. If that's the case, it'll make an excellent substrate for something else.
-
And the gel coat is stable in UV light?
-
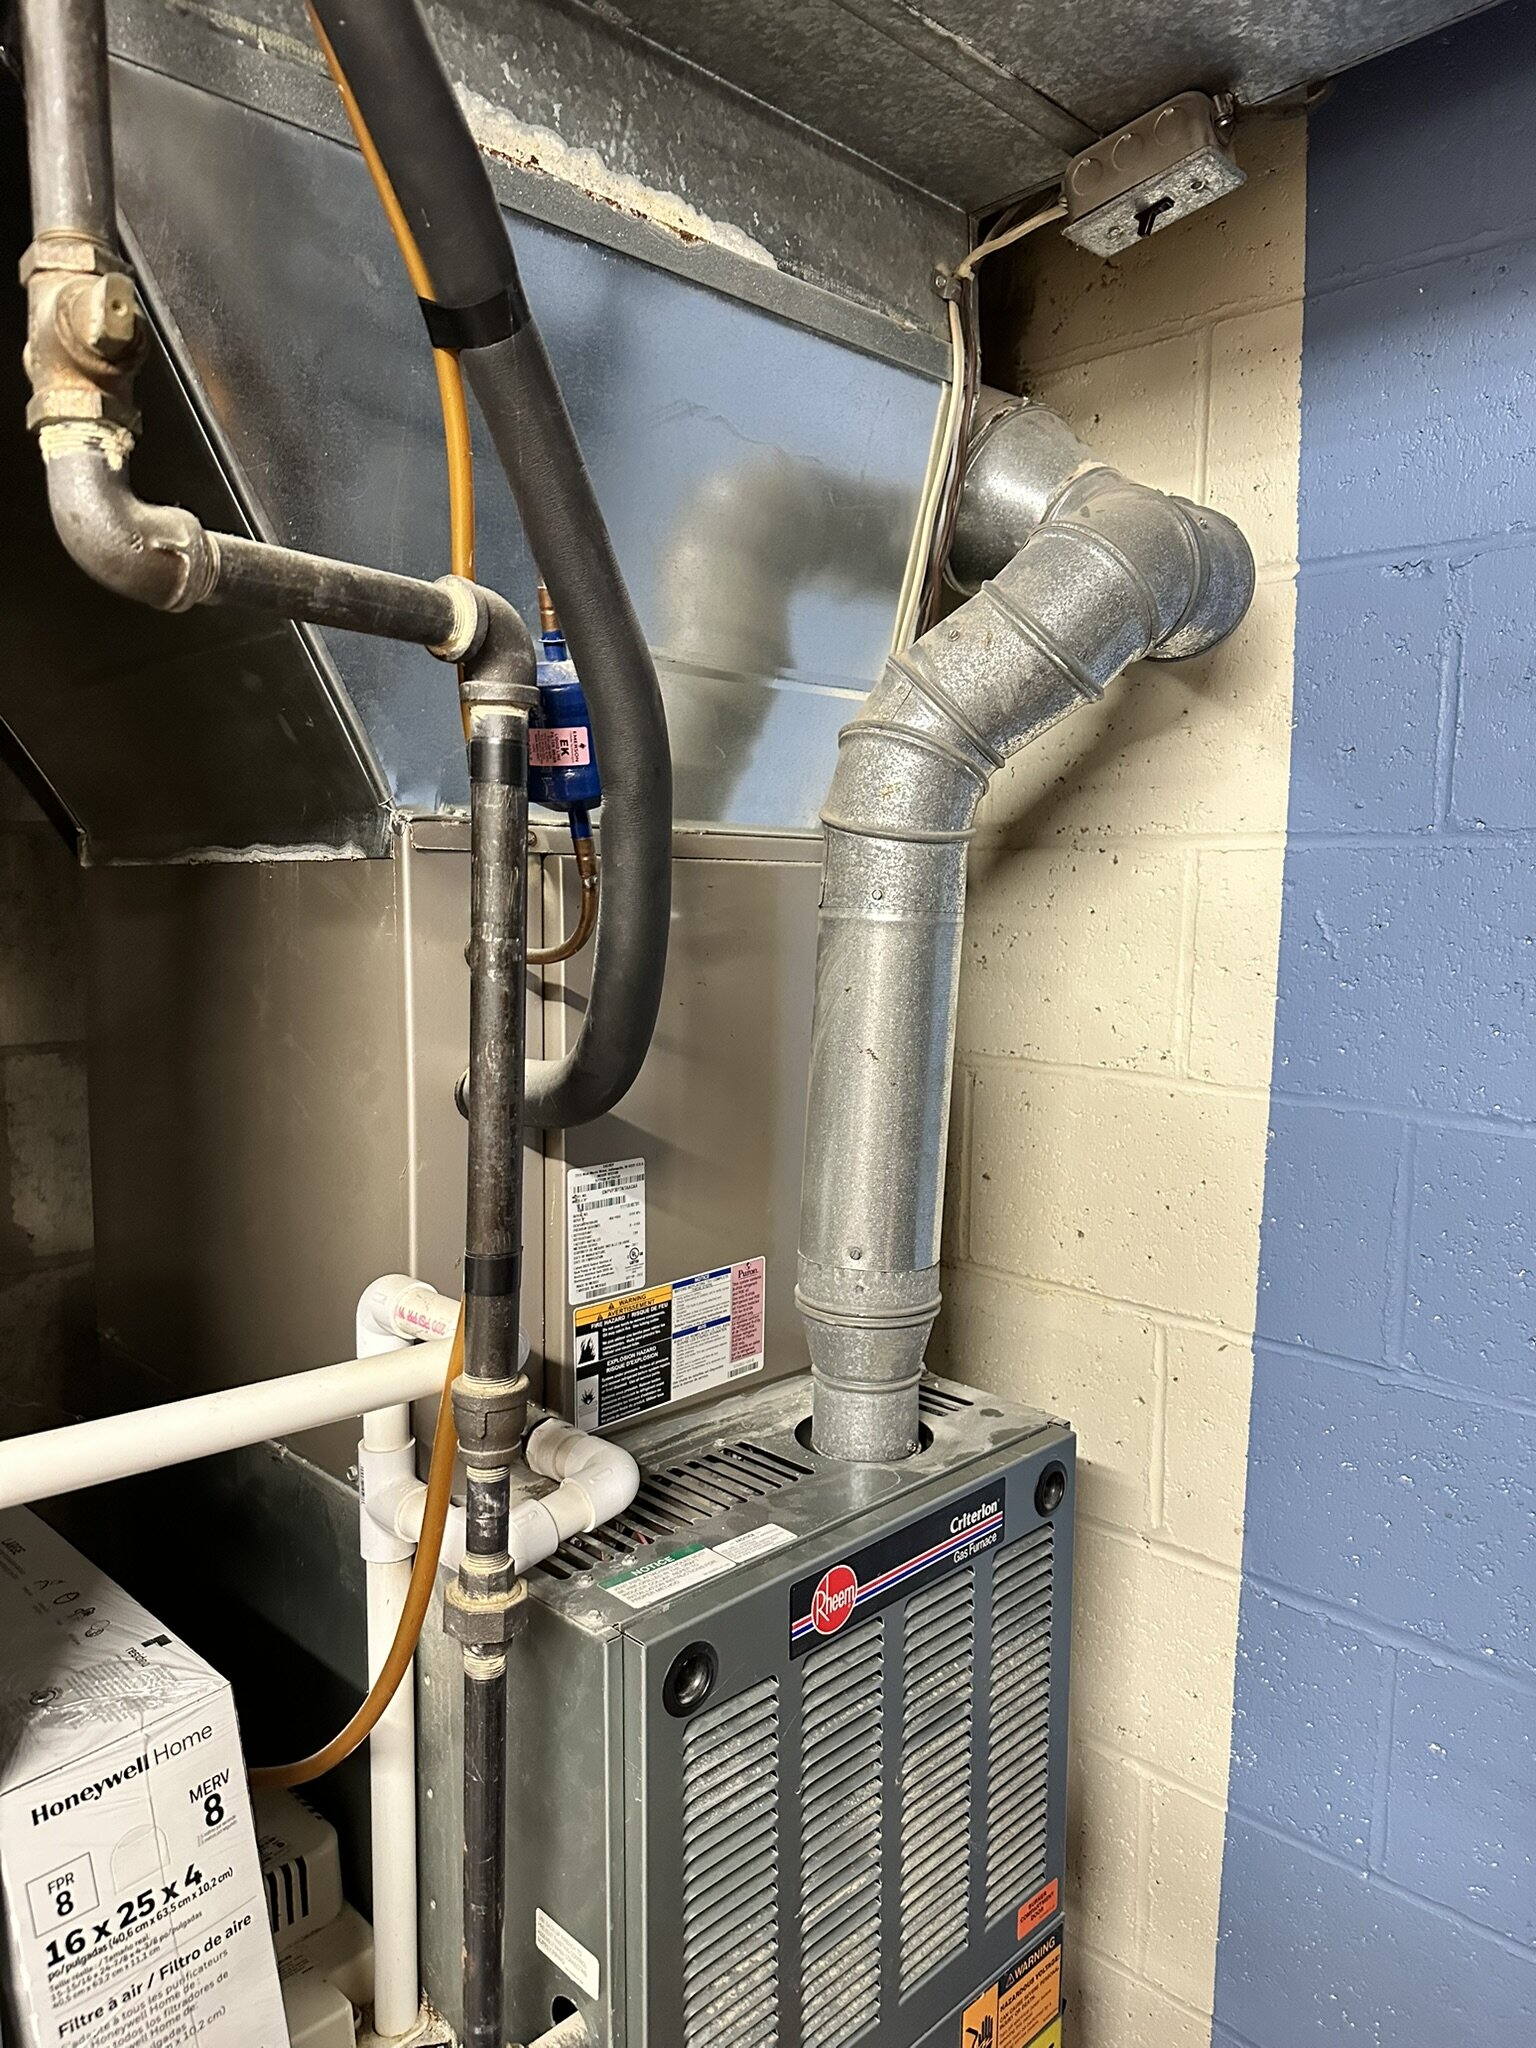
 HI, I could use some expert opinions. I need to replace my heating ducts due to age and corrosion to the point of giant holes in them. They existed for 50 years concealed behind a false wall in my basement. The furnace was replaced in the mid nineties but it appears they just connected to the existing flue. When I tore the wall out for remodeling, I discovered the corroded flue pipe. I'm looking at a 100,000 BTU Category 1 fan assisted Rheem furnace. The furnace outlet is 3 inches, which expands immediately to 4", does a dual 45 bend around the side of the furnace, into a 90, then expands into a 6" pipe, where you can already see signs of corrosion. It then does a 3 foot run, a 90 degree bend, then a 4 foot run to another 90 degree bend into to what was then an unlined masonry flue. The chimney flue rises around 20 feet. This is a single story ranch. The run past the 90 where it was behind the false wall is heavily corroded with numerous holes. It looks like heavy guage aluminum. Parallel to the furnace flue is a 40,000 BTU natural drafted water heater with a 3" flue that runs in a straight line 9 feet, then turns a 90 into the flue. I've just had chimney work done and they installed a 6" stainless steel flue liner terminating in a wye at the base of the flue. I now need to install replacement ductwork to attach to it. To summarize, I need to vent: a 100,000 BTU Category 1 fan assisted Rheem furnace, which rises 3 feet 9 inches in a 9 foot run to the flue, with two 45s and a 90 bend. a 40,000 BTU natural draft water heater, which rises 2 feet in a 10 foot run, than a 90 into the flue. My "in stock" furnace flue options at Lowes or Home Depot are. 4" B vent 4", 5" or 6" C vent. I'm not against special ordering or going to an HVAC warehouse, if I know what it is I need. the surrounding material is concrete block on the walls, with wood floor joists and a rim joist overhead. I plan to enclose the vents in a finished bulkhead, which will be removable for inspection and service. I do not have 6" clearance to the joists. I could install a firestop on the joists if that's acceptable. I'm confident I can do the physical installation, but two or 3 days of reading through the NFPA code, with help translating from ChatGPT, and I'm not convinced I'm understanding any better what the code requirements for the flue pipe size are. The chimney guys were nice enough to temporarily connect the existing ductwork to the new wye, but I need to get this replaced asap.
-
 Is radon really a concern there in the Phillipines?
 -
 Here’s a quick tip for anyone buying or selling a home—don’t skip radon testing during your home inspection. Many people overlook it, but radon is a silent health risk that can be found in any home, old or new. Adding a radon test to your inspection is simple and affordable, and it can help you avoid major problems later. If high levels are found, you can negotiate repairs or install a mitigation system before moving in. It’s a small step that gives you big peace of mind knowing your new home is safe. Has anyone here added radon testing to their inspection before?
 -
Good points all. Thank you.
-
I did soldered seam terne on my balcony. It was *very* time-consuming. I considered standing seam metal, but what you can't see in the photos is a flare at the bottom of the slopes. I thought it would look cool, and it does, but you can't see it from the ground. If you visit, be sure to check out the cool flare from the upstairs bathroom window. I was afraid the standing seam would not accommodate the change of slope.
-
Looks like something that will protect the structure for a very long time. I gotta ask though, why not terne? I'm sure you thought about it. It would have been fun to do standing seams with hips.
-
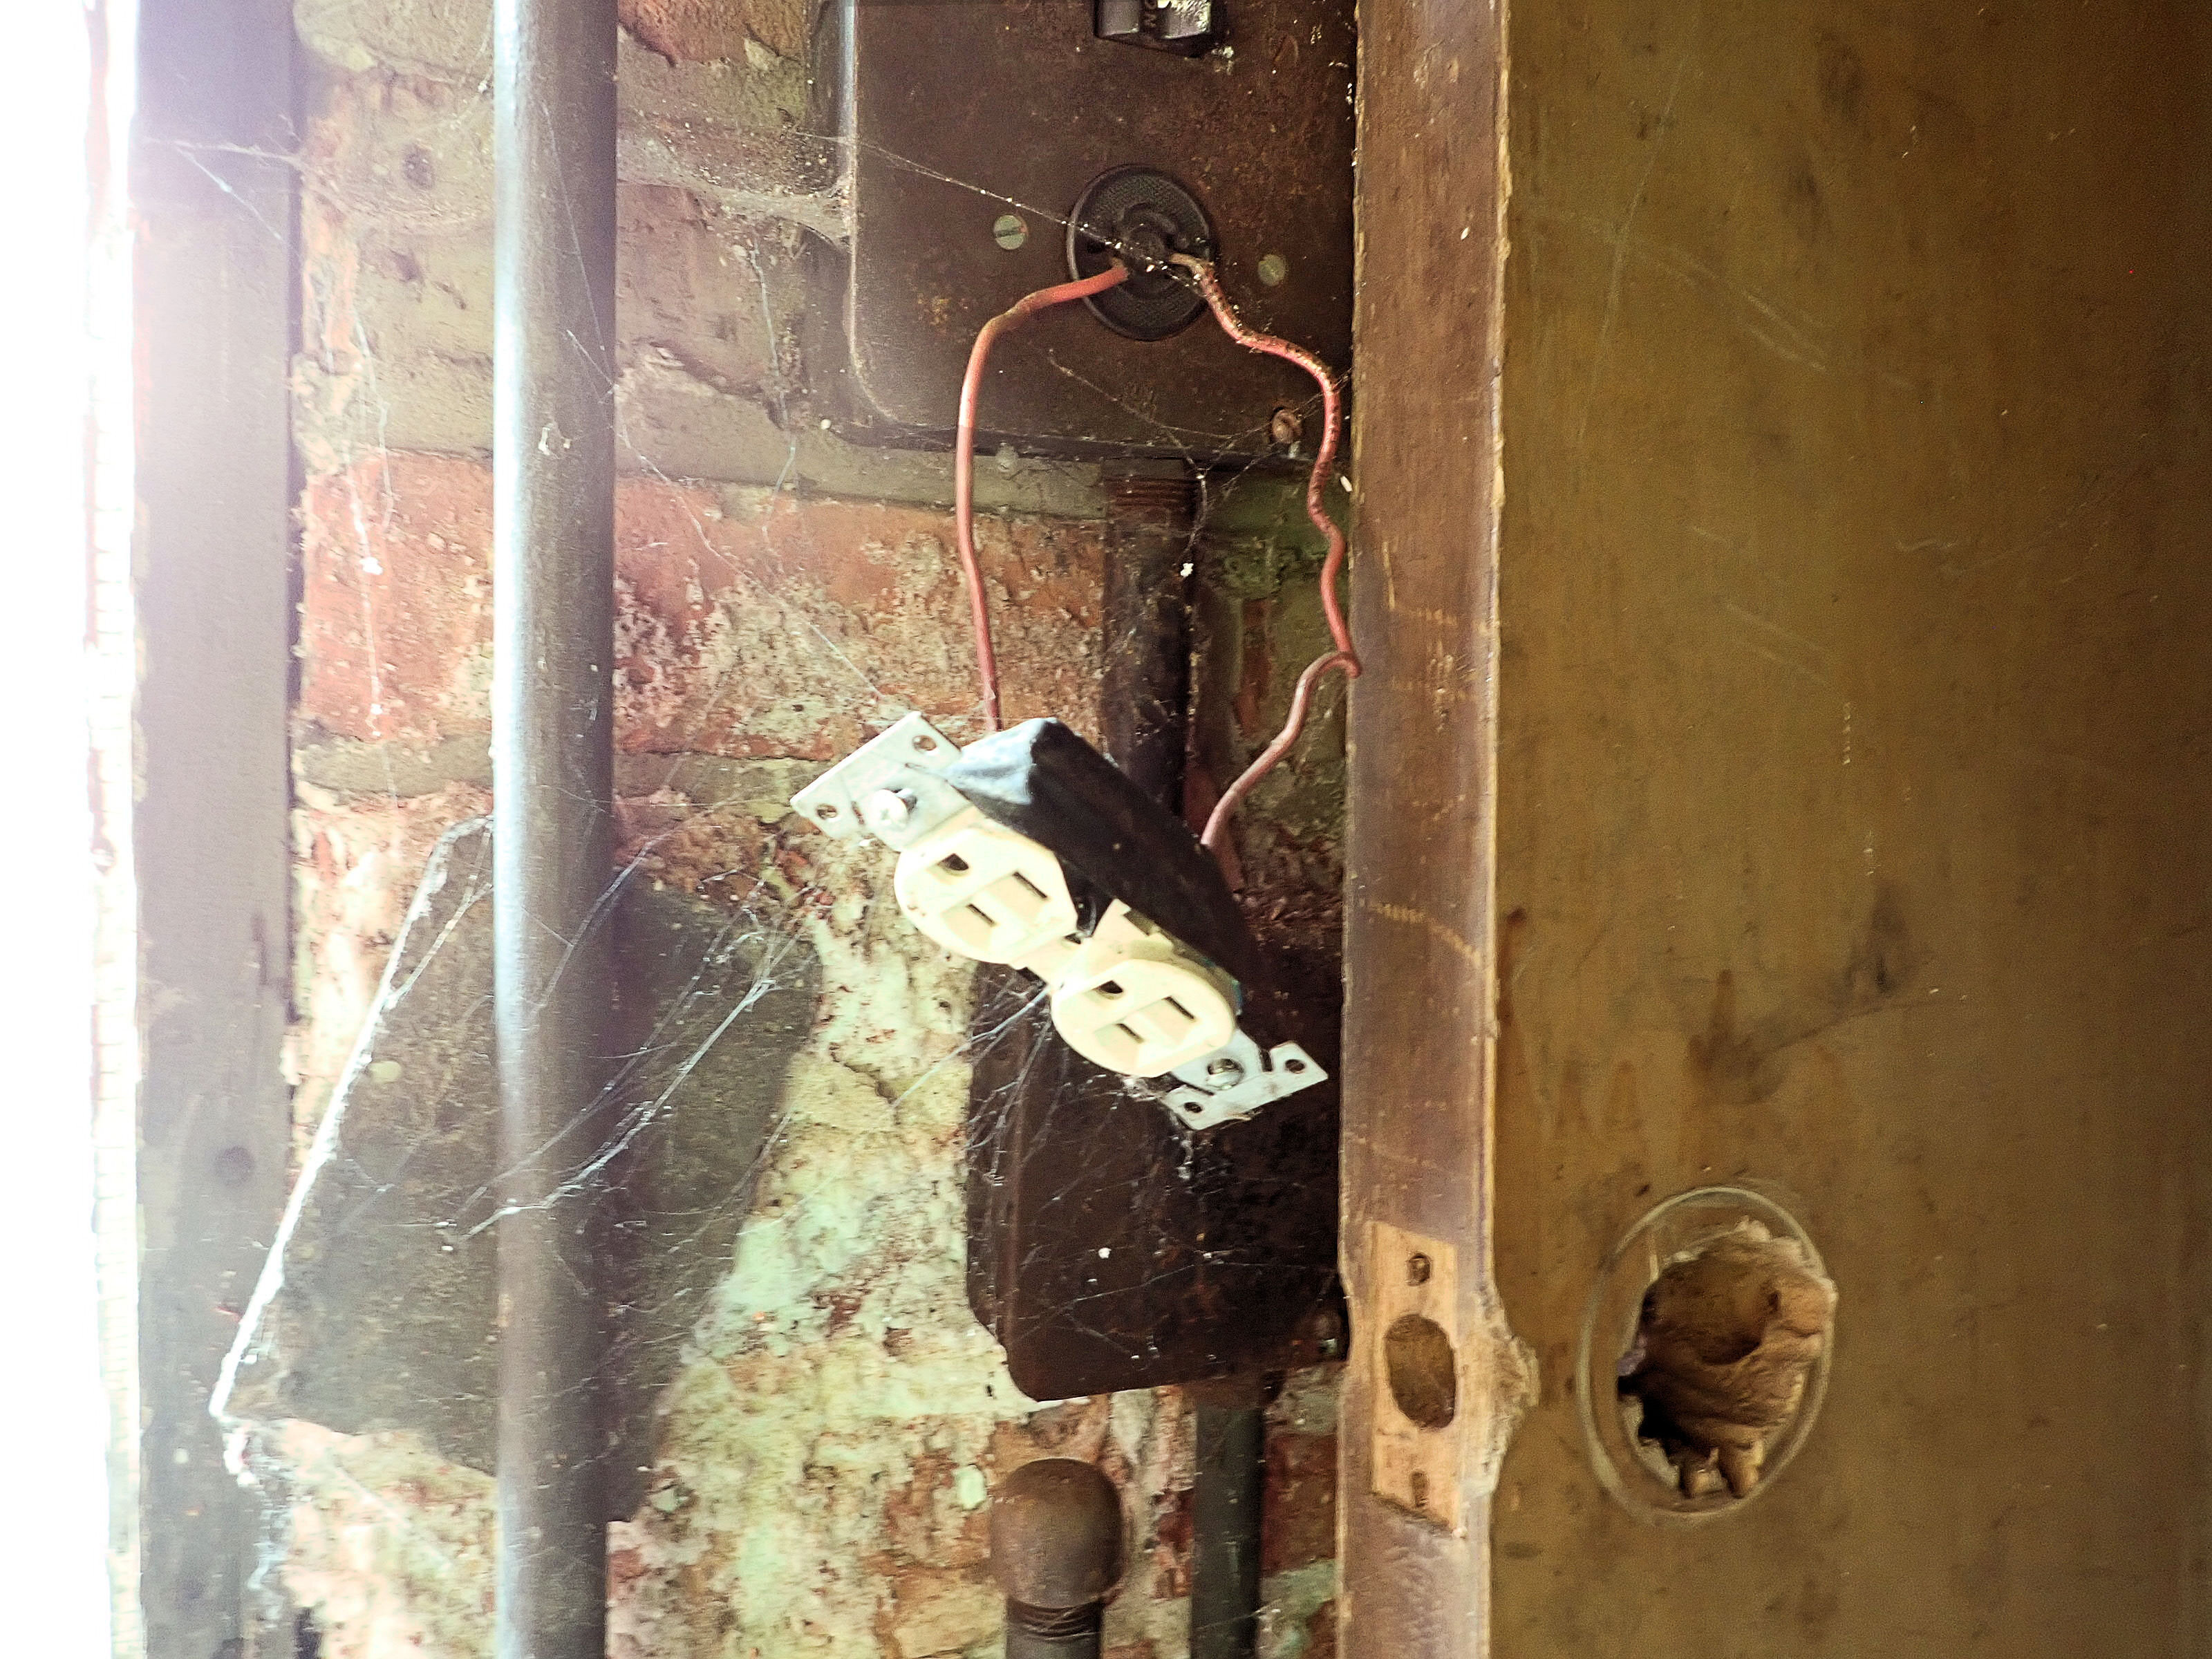
The most serious concern is the misidentification of the neutral conductor.
-
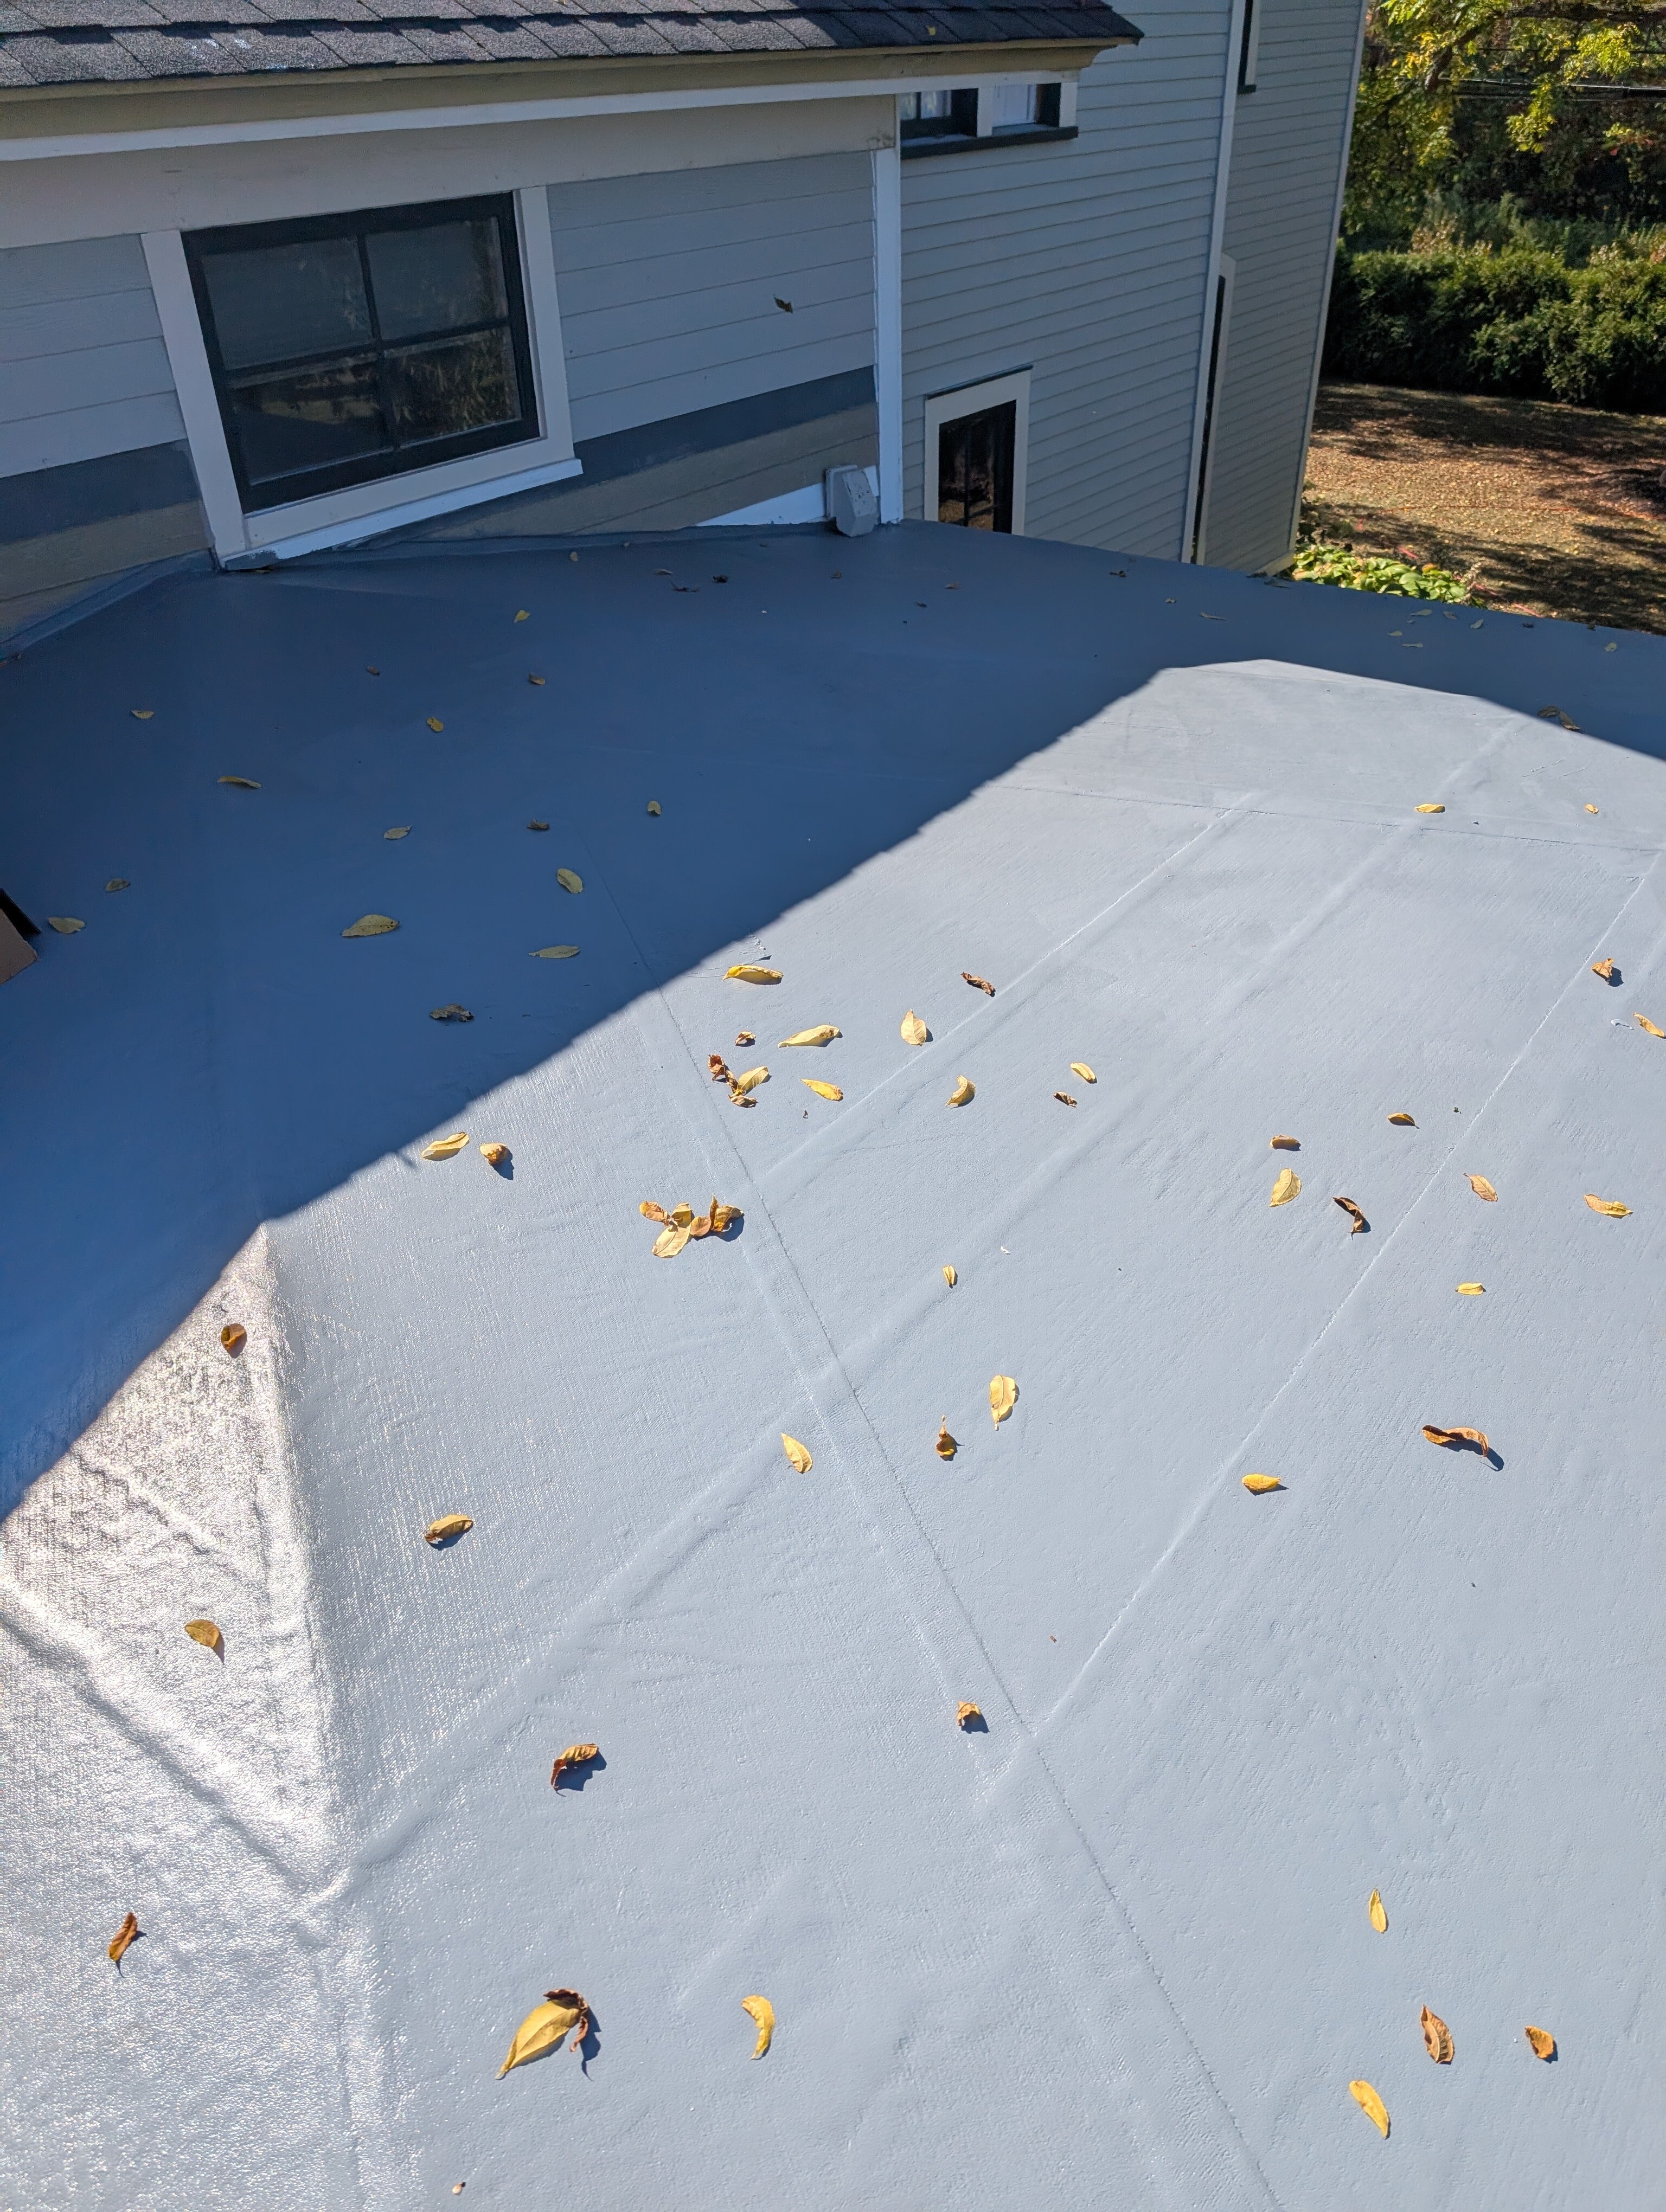
We added on to our old farmy Italianate house. It's mostly done now - I still need to add a few layers of trim and some corbels. The original house has a Medina sandstone foundation I built the addition foundation of the same material. The elevations of the addition ended up pretty close to two existing second-story windows that I didn't want to move. It left very little possibility for slope on the roof. So we built a hip roof with the lowest slope being about 1-1/2:12, and the steeper side slopes are about 2-1/2:12. There's not enough slope for any regular roofing except for products used on flat roofs. After a bit of research, I found that it's really common to use FRP(fiberglass reinforced polyester), AKA fiberglass in the UK, so I gave it a shot. Most of you know I come from an automotive background, and I'm experienced with fiberglass resins and fiberglass mats/ cloth. Still, there was a lot to learn. I learned a lot about the different resins, cloths, and appropriate weights. It was a fun diversion from peel-and-stick or modbit. The roof is two layers of 1708 cloth installed with polyester resin. It's about 220 ft. I used 14 gallons of resin. I pre-made the flashings and installed them first with fiberglass cloth and resin. Learning how much resin you can put down at a time was the most anxiety-ridden portion of the project. Once the resin and cloth were installed, I protected the assembly with two coats of gel coat—the top coat contains what's referred to as wax. The wax is a mixture of styrene and paraffin wax dissolved in acetone. You mix that into the top coat of gelcoat, and the styrene and paraffin rise to the top during the cure. They create an airproof layer that allows the gel coat to fully harden rather than remain slightly tacky. I'm fully aware of the pedantic nature of this crowd. The siding is all different colors because I had enough scraps from other jobs to fill it in.
-
I'm not a fan of the ground in the up position.
-
"The garage receptacle tested as open ground..." 🥸
-
I know. It should be a GFCI.
-
Back in 2007-8, during the 'loan crisis', I'd see hydronic cast iron sectional boilers that 'sat' with no pilot/heat for many months literally rust-themselves-apart and leak at the sections due to sitting cold in summer and sweating (with water in them).... In-use boilers, especially those that double as DHW heat-source tend to 'make it' very well.. .just a thought.. .
-
I was 'hard at it' from 1969-1984..let's put it this way, the "The Cars' manager was my manager--twice! (Not all his projects took off!). Then 'life/marriage/kid/career' intervened. I started getting back in the music around 2002 or so.... It's been a great thing.. I started foolin' around with music in 1958. Home inspection saved me though (besides the 'Man upstairs') !
-
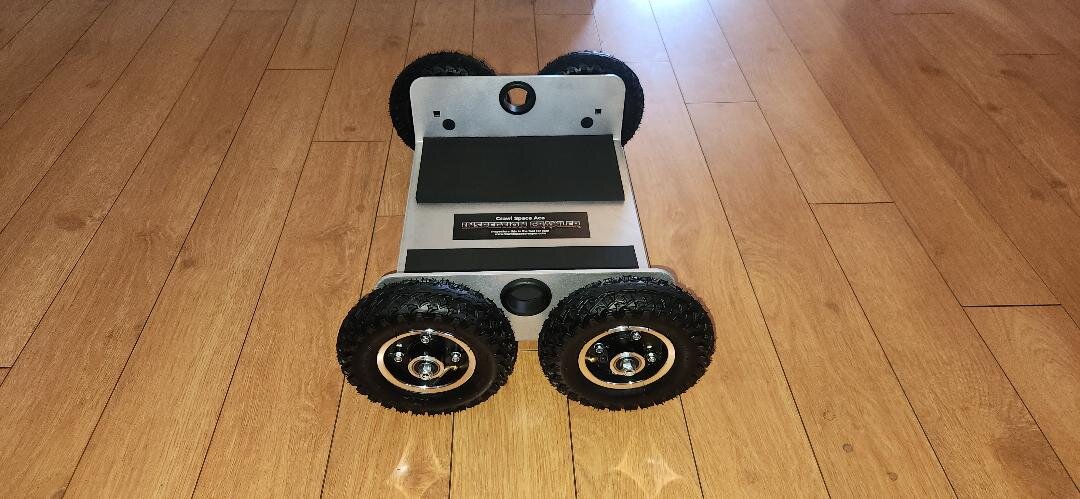
Crawl Space Creeper - Under House Creeper
crawlspacecreeper replied to crawlspacecreeper's topic in Foundation Systems Forum
Hello everyone, www.Crawlspacecreeper.com is now an official vendor for ASHI (American Society of Home Inspectors) and interNACHI (International Association of Certified Home Inspectors) The crawler is hand assembled right here in Anderson California 96007 USA. Latest review from one of our valued customers. David T. from California - I love the new crawler Dave, I like it better than my original Krawlgear crawler! Built to last - helping home and pest inspectors across the USA traverse the crawl space saving their lower back and knees. www.Crawlspacecreeper.com FREE SHIPPING!
-
I gave it a listen. Good stuff. I know how much time that takes, my boy is a musician. He's heading out today for a music festival in Syracuse where he will be the sound engineer and also DJ a set of his own electronic music, one of many projects he has. He's been struggling for a week to get his setlist in order, his gear together, and his projects at the day job caught up enough to disappear for 3 days.
-
Thanks, Bill.
-
It's Preservation Brief 42. I uploaded a pdf - click on the Library menu tab.
-
-
If it's cast stone, there are many products available for consolidating, repair and protection that certainly can't be used with limestone. One of the Preservation Briefs deals exclusively with cast stone. There's some info about spalling/erosion/deterioration and repair methods that might be useful here.


.thumb.jpg.47289739c2f0532f4faffd07858bee59.jpg)